Friday, August 30, 2013

The "CONTENTMENT" Quilt - Block 2, here comes the stork!!


Here is another "Contentment" block - this one noting the birth of our daughter.  "Contentment" is a story quilt I am designing for our 20th wedding anniversary this October.


I love the idea of the stork delivering the baby...a very traditional idea.  As I recall, this was a very appealing idea to me about the sixth hour of labor, LOL..."here, storkie, storkie, storkie...I have some hospital saltines for you..."

I had a long, single strand of orphan gold thread that I used to chain-stitch the delivery cap...it makes him look a little more official, doesn't it...maybe I should go back and give him a little bow tie, his skinny little neck looks so naked.


I studied a lot of pictures of storks and then tried my hand at sketching one.  Remember the stork that delivered Dumbo to his sweet momma elephant?  Leave it to Mr. Disney to gloss over the ordeal of birth...how many of us thought that OUR babies would be magically delivered by stork one day when we grew up?


I liked doing the feet and the knobby knees...


I'm still trying to decide how I feel about the lettering.  I like the presentation of information, after all, this is a story quilt.  But all that data does makes the block seem crowded...maybe I need to make the blocks 12 inches instead of 10 inches?  What do you think?


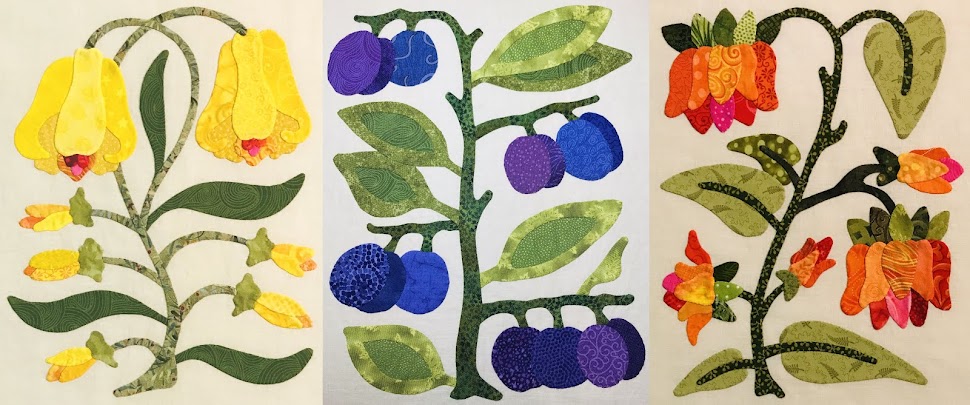
All the leaves and petals are great ways to use up the tiniest scraps...and eliminates fabric decisions...they all work!


I hope you get lots of stitching done over the long, holiday weekend.  I am glad I got the stork done before Labor Day, since "they" say we are not supposed to wear white AFTER Labor Day, LOL.

In stitches,
Teresa  :o)

Thursday, August 29, 2013

"Baltimore Rhapsody" Block #20 - the banjo


The next block in the "Baltimore Rhapsody" quilt project is the banjo, and is also the first folk instrument in my original applique music block series.


This instrument originates from the African banjar, and was brought over to the United States by early slaves. 

Crude instruments were built here in this country by tightly stretching a coon skin over a hollowed out gourd.  A handle was attached, along with 4 strings.  Soon it became known as the banjo and was a source of plantation songs and dances.


Soon they were made from wooden or metal hoops and had 5 strings.  This hound dog is patiently waiting for his master to come back and play for him!


Melodies can be played on the banjo, but more commonly chords are played rhythmically as accompaniment.  Very fine players can play the rhythmic arpeggios while featuring the melody note prominently "on top" at the same time (a technique also used by guitarists).


Around 1830 the banjo could be found around the campfires of the westward movement in this country.  Everyone knows Stephen Foster's song "Oh, Susanna!" about "coming from Alabama with a banjo on my knee."


The rhythmic syncopated melodies played on the banjo led to the early jazz style called ragtime, and until 1930 banjos were a basic member of the rhythm section of dance bands.  It was then replaced by the smoother sounding guitar.


The banjo is popular once again thanks to musicians like Bella Fleck, Pete Seeger, and the comedian/actor/musician Steve Martin.
  
It also lends its characteristic sound to bluegrass and American Folk Music.


Some musical snobs define "perfect pitch" as throwing a banjo into a dumpster without hitting the sides.  It is their loss.

In stitches,
Teresa  :o)

Saturday, August 24, 2013

Spa treatment for finished blocks...


The first two blocks of my new "Contentment" project are all hand appliqued and ready for my "glue removal spa treatment..."


I use two different glues while doing my hand applique...both temporary, although they are both archival glues and could be left safely in the fabric.  I start out with cool water, and add more and more warm water as I am assured of my fabric's color fastness (I'm a fabric washer, so I am pretty sure of nothing running at this point...).  Warm water seems to dissolve the glues faster for some reason.


I use Elmer's Disappearing Purple Glue Sticks (the smaller size) to glue my raw edges to the back, or wrong side of the fabric.  I've seen pre-schoolers sucking on those madly, like a purple Popsicle...those suckers are SAFE (no pun intended).

And because hand sewing around straight pins make me super cranky, I use Roxanne's Glue Baste in teeny-tiny dots to hold things together while I concentrate on invisible stitches.

(You can faintly see my "dot-dot-not-a-lot" dots on the wrong side of the pant legs below.  Even when I use the tiniest dot possible, they spread out when the 2 fabric layers are mashed together.)  

I soak, gently squeeze, replace water, and repeat until I can no longer see the little dots.  The glue stick comes out in minutes.  The Roxanne's takes a little longer...a lot longer depending on how much glue baste you use.  

I left these two blocks about 4 hours...I walk by and squeeze-release a few times while they are swimming around to help the process along.


WITHOUT WRINGING, I GENTLY ball up the blocks together and squeeze out the excess water.  I was super gentle this time, as I had already cut away a little bit of the backing behind larger motifs to remove excess dark fabric that was peeking through.  (I usually sew some layered motifs together before placing on the background, but this time I glue basted everything together so I could stitch on them away from home.


I gently pat each block out, right side down, on a clean towel over my pressing surface.


I fold the towel over the block, then gently roll up the towel.


Then I gently squeeze along my roll, NEVER wringing.


I pat out the block again on my towel, face down, and pat to smooth it out, NEVER pulling or tugging.


 (pat-pat-pat...)


I press (lifting to move the iron) with my hot, dry iron to mostly dry the block and remover wrinkles.


These blocks will finish 10 inches when I trim them down, which I will wait to do, just in case I change my mind about the setting, etc  

This one commemorates the day we met...


Hey, check out LuAnn at Loose Threads...she is using the glue sticks to make her hexies...so cool and so clever!!

In stitches,
Teresa  :o)

Monday, August 19, 2013

AQS Grand Rapids and it's time to come clean, everyone...

Me and "Folk Art in the Vineyard"

I had WAY too much fun in Grand Rapids at the AQS show last Friday.  My black "Folk Art in the Vineyard" wall hanging just seemed to melt into the black draped display, making it look a little mysterious.  My quilt was hung not too far from Lori Smith's booth (From My Heart To Your Hands)...she just had to lean over a little to see it.  The center blocks from my quilt were made from her pattern, "Folk Art Applique."

Jo, Judy and me

It was fun to go with Judy and meet up with other quilting friends for lunch, dinner, and show-and-tell of our purchases.


I had the opportunity to meet Sharon (currently no blog), a cyber quilting friend, in person and take pictures in front of our quilts! We have so much in common (born in the south, re-planted in the Midwest, love hand applique...).  She brought me this beautiful little bag of goodies that she had made (I was so overwhelmed!).


I am still discovering little details like the homemade attached rose and the little eyeglasses zipper pull...too cute!


And look at all the fun stuff inside!  (including a matching little tissue holder...)


Jill, of Berry Wood Lane, and I were hoping to meet at the show, but we ended up going on different days...this is her beautiful "Sunshine Sherbet," made with cheerful, sunny 30's fabrics, (picture posted with her permission).


I did my part for the economy, but found that I didn't need to report my credit card as "stolen," LOL.  I was a GOOD girl!  I did get a couple of patterns from Lori's booth...I love EVERYTHING she does.


I also stopped by the Primitive Gatherings booth...danger, danger!! I bought a wool applique kit to make as a Christmas gift.  Can you believe that I have never worked with wool?!?  I don't own any, so I had to buy a kit.  Their sample was just irresistible...I guess that is why they make them...


Look at all the beautiful colors of wool!  It will be fun not to worry about turning the edges under for a change...


Of course, my kwazy kat had to "staple" all the pattern and kit bags that I brought home (he was a stapler in a previous life).


I also got a cone of Aurefil thread for piecing and these cute little "minders" for balls of pearl cotton embroidery thread.  Don't they look just like the little goodie containers holding prizes that came out of those machines you put 25 cents into (next to the bubble gum machine, in the arcade)?  I bought them because they are practical and because I was feeling a little nostalgic.


And look what I found for a certain someone recovering from a knee procedure...I think I really shocked my show companion when I stopped at THIS booth (this is all they were selling in that particular booth, and they were making a KILLING!).


Yes, I am afraid it IS what you think it is..."bow-chicka-bow-bow..."


OK...now time to pose a question...
What is the funniest/weirdest way you have sneaked quilt show or quilt shop purchases into your house/stash?  I've heard stories of disguises and secret compartments, spare tire storage areas of car trunks filled with bags of fabric (but no tire...).  Time to fess up (WE won't tell...).
In stitches,
Teresa   :o)


Wednesday, August 14, 2013

How to build a banjo...and a hound dog!


It is MUCH easier to build a banjo from fabric than from wood! With the help of my trusty freezer paper, Elmer's glue stick and little bottle of Roxanne's glue baste, I started building the body of the instrument first.  (I can see I will have a little trimming to do on the back after hand stitching as I can see too much dark shadow showing through the banjo's "face" - from the darker arcs of fabric that surround the large, neutral circle.)

This will be another block for the "Baltimore Rhapsody" project.


Once most of the rings of the body are glue-basted, it is on to the neck of the instrument.  Pattern weights make accuracy easier to achieve with my fumbly, clumsy fingers.  With part of the motif anchored by a pattern weight or two, I can easily pry up the edge I want to work on without scooting the piece off the pattern drawing.  

(When remembering "dot-dot-not-a-lot" with the glue baste, there is no danger of gluing my motif to the pattern paper...teenie-tiny dots of glue baste go a long way if you give them a couple of minutes to dry, mostly...I just plop a pattern weight on and go on to something else while adhesion is allowed to work.)


I really want the instruments to look life-like, which means paying attention to spacial dimension, perspective and shading as I draw them.  Designing in only two dimensions reduces the full beauty of the instrument design and makes them look too cartoon-ish for this "Baltimore Rhapsody" project.  


I really love this method of applique prep for doing these little slivers...now you SEE the freezer paper...


 ...now you DON'T!  No raw edges, and all ready to hand stitch to the background!


My poor hound dog looks a little freaky in pieces!  I have found a way of reverse appliqueing the eyes to make them easier and more life-like.  When I turned the outer edges of the head under and secured them to the wrong side with glue stick, I also turned under the edges of the eye sockets.  Then I "built" the eye, and made it so that it peeks out through the hole.  It is much easier than dealing with the really tiny pieces on top of the head.  

I will do a more detailed tutorial on how I did this next post because I think people are a little mystified by reverse applique.  I find that using the technique gets me out of some sticky, difficult applique situations.  


I usually leave the freezer paper adhered to the pieces until after I glue baste the unit together, working over the pattern.  That way I can be lazy and not get my light box out, but this time I removed the paper first (I already had it out, working on something else...).


I used different golden tan fabrics for the dog's body pieces so that I could avoid some outline embroidery later, but I am not sure there is enough difference in value and scale...I will probably still add some embroidery details later.


Now I add the antique milk can that the banjo is leaning against...


The banjo will get strings and lots of detail with the embroidery floss after it is stitched to the background and soaked to removed the glues.  

I have already hand appliqued these pieces together...I do this so I can trim the background away, if I choose to, later, in preparation for detailed hand quilting. I also find it easier to stitch motifs together in units before glue basting to backgrounds...I don't like handling the bulk of the big background any more than I have to!  

(And the units are very portable in a baggie as I taxi my daughter around to different things.)

Little skinny things, like those shadowing slivers on the banjo neck, I DON'T hand applique before putting on the backgrounds...stuff like that is too fiddly, could unravel, and is better stitched directly to the background. 


Now I need to work on prepping the vine and flower pieces so I can glue baste the whole block together.  Cheer up puppy dog...your banjo will be finished soon!

In stitches,
Teresa  :o)